Create and send a customer link
Use a customer link after you have created a booking. The customer can provide their details, accept your terms, pay the requested amount, and return to the same page during the rental. To let someone browse vehicles and start a new booking, use the Guest Book.
Enable customer links
Open Settings → Channels → Shareable links, enable shareable booking links, and save your changes. Configure the information you want to collect under Settings → Channels → Global → Personal info fields.
For online collection, connect a payment provider first. Without one, links skip payment. An open-ended rental’s customer link collects information and terms acceptance; recurring rental payments use the booking’s billing workflow.
Generate the link
- Open the booking and find Customer link.
- Check that a vehicle or requested vehicle class is selected. An assigned vehicle must have a class.
- Open Options before generating to choose what the customer needs to do.
- Click Generate. Open the link from the card to check the customer page.
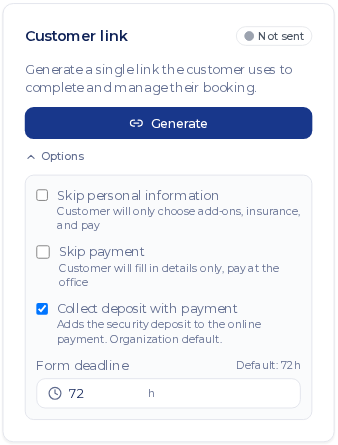
| Option | Use it when |
|---|---|
| Skip personal information | You already have the required customer details. Terms acceptance can still be required. |
| Skip payment | You will collect payment separately or only want to share the booking. This does not mark the booking paid. |
| Collect deposit with payment | You want the refundable security deposit collected alongside the rental payment. The displayed default comes from the customer or your organization; the booking can override it. |
| Form deadline | Set how many hours the customer has to complete the initial confirmation. The default is your organization’s setting. |
With both skip options enabled, the customer can see the booking summary. A document appears for signature only after you request that signature separately.
After generating, the card’s ⋯ menu lets you change the options that are still available. Personal-information options stop appearing once the form is submitted; payment options stop appearing once payment is complete.
Choose the recipient and send
Use the arrow beside Send to choose the customer email, company email, or another email address. If SMS is enabled, the menu also offers the customer’s phone number and a custom number.
Check the selected channel before clicking Send. When SMS is enabled and the customer has a phone number, the main button sends an SMS by default. Otherwise it uses the customer email, falling back to the company email.
You can also copy the URL and send it in your own messaging app. Copying the link does not create an email or SMS delivery record in Nomora.
The address used for this send is recorded on the card. Choosing another email does not replace the customer’s saved contact details. Automatic messages can use the saved customer or company email, so keep those correct too.
Check progress and resend
The card shows link creation, sending, saved customer details, and payment separately. Customer details can be saved when the customer reaches the last step, before final submission or payment. A tick beside details alone does not prove they have finished confirming.
Before the form is submitted, Resend beside the sent row opens the recipient picker again. Choose the correct address or number, then send. For an email already recorded in the booking’s activity history, open its preview to inspect the original message and available resend actions.
For missing emails, check the recipient and delivery status in the activity history before resending. A bounced message needs a corrected address. See messages and reminders for automatic-message conditions.
Expired or revoked links
The form deadline applies to initial confirmation. A customer who has already completed it can still use the customer page for the actions available at that rental stage. The expiry of a payment provider’s checkout session is separate; send the Nomora customer link so the customer can open a fresh checkout from it.
If an unsubmitted form’s deadline has passed, resending the same URL does not extend that deadline. Review the booking first. To issue a replacement through the booking card, open ⋯ → Revoke, confirm, then click Generate new link and send the new URL.
Revoke also stops access through the existing customer link. It does not cancel the booking or return money. Use booking cancellation for the booking itself.
After the customer confirms
Review the saved details and payment record on the booking. Then continue with documents and pickup and return. Customer schedule editing and inspections depend on the options you have enabled.