Distance Allowances
Cap how far a customer can drive during a rental and charge for the extra distance automatically. You set a daily allowance — on the vehicle or per vehicle class with mileage tiers — record the odometer at check-out and check-in, and any overage is priced and added to the booking total the moment the vehicle comes back.
All distance values follow your organization’s Distance unit setting (km or miles); the examples below use km.
How the Math Works
- Total allowance = daily allowance × calendar days. Calendar days are the booked period rounded up to whole days, minimum 1 — a 3-hour rental still includes one full day of allowance.
- A booking can instead carry one total for the whole rental (e.g. 1,000 km). That total doesn’t change with the rental length.
- Overage = (distance driven − total allowance) × price per extra km.
- A vehicle with no allowance of its own still gets one from an applicable class mileage tier. Mileage is unlimited only when the booking has no allowance override, no applicable class tier, and no vehicle allowance — or when it carries the unlimited mileage add-on, which outranks all three — odometer readings are still recorded at check-out and check-in, but nothing is charged.
- Returning early on a fixed-dates booking doesn’t shrink the allowance — it’s always based on the booked period. Open-ended bookings count days up to the actual return.
For example: 200 km/day at €0.15 per extra km on a 3-day booking includes 600 km. If the customer drives 745 km, the 145 km overage adds €21.75 at check-in.
Set a Vehicle Default
- Open Fleet → Vehicles and click Edit on the vehicle.
- On the Pricing tab, find the Mileage Allowance Defaults section.
- Set Km Allowance per Day (e.g. 200) and Price per Extra Km.
- Save.
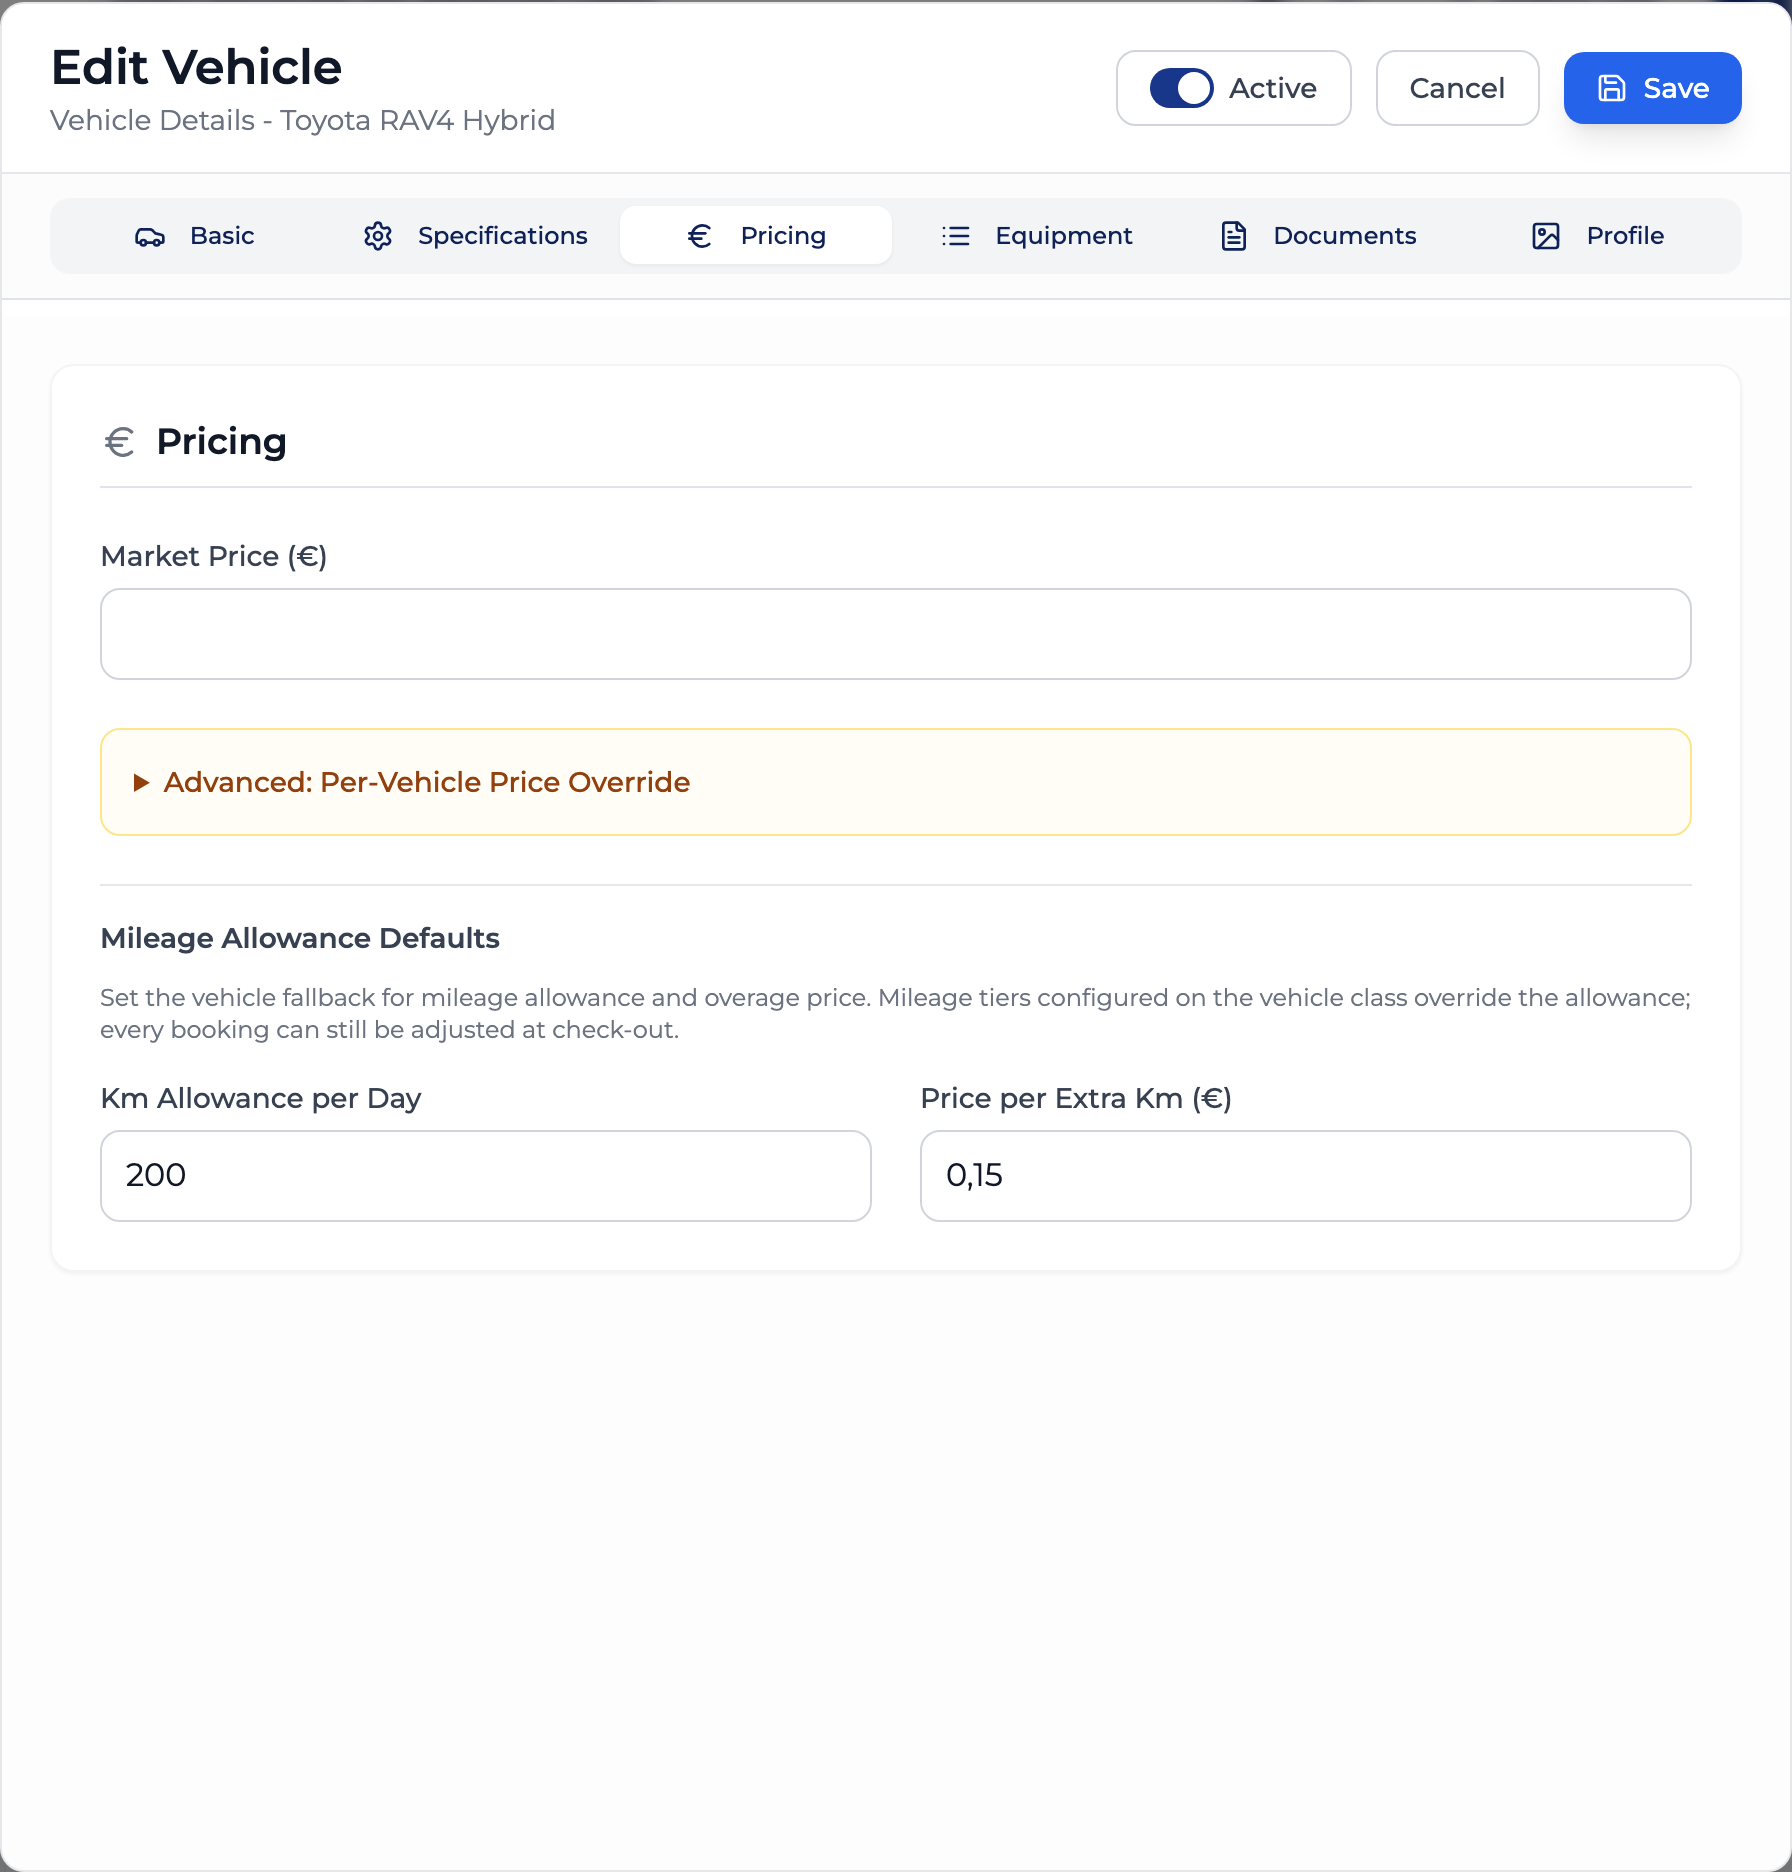
These are the vehicle’s fallback values — they apply to every booking unless a class mileage tier or an allowance agreed on the booking replaces them.
Mileage Tiers by Vehicle Class
If the daily allowance should depend on how long the booking is, set mileage tiers on the vehicle class instead of editing vehicles one by one.
- Open Settings → Pricing and expand the vehicle class.
- Open the Advanced section and find Mileage Tiers.
- Click Add Mileage Tier and set From Days and Allowance/Day — for example from 1 day 300 km/day, from 3 days 250 km/day, from 7 days 200 km/day.
- Set Price per extra km under the tiers so the whole class shares one overage price.
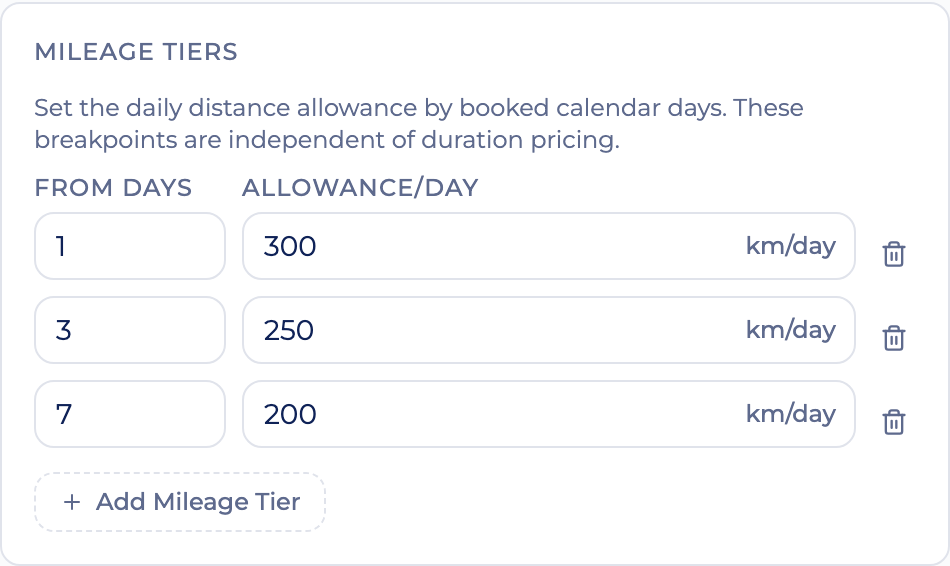
- The tier whose From Days is closest to (but not above) the booking’s calendar days applies; open-ended bookings use the longest tier.
- Tiers override the vehicle’s own daily allowance. The class Price per extra km overrides the vehicle’s too; a vehicle’s own price applies only when the class has none.
- These breakpoints are independent of duration pricing tiers, so your rate discounts and allowance steps don’t have to line up.
Agree an Allowance per Booking
When you negotiate a different limit with a customer, set it on the booking as soon as it’s agreed — you don’t have to wait for check-out.
- New booking: on the Details step, click Set mileage allowance.
- Existing booking: on the booking page, click the edit icon on the Rental Journey card.
Type into Km per day or Km in total and, if it differs, the Price per extra km. The other allowance field fills in from the booked days, with the calculation shown underneath. The field you typed in last is what the booking keeps: a per-day figure grows if the booking is extended, a total doesn’t. Leave the fields empty to keep the vehicle class or vehicle default.
The agreed allowance is kept at check-out and printed on contracts generated before hand-over. Contracts print a whole-rental allowance with {includedKm}; {kmAllowancePerDay} stays empty for those bookings.
Before check-out, a booking without an agreed allowance shows its default on the booking page and on contracts — the class mileage tier or vehicle value it will get at check-out.
At Check-Out
When you check the vehicle out, the booking’s allowance is locked in:
- Enter the Departure Mileage — or click Fetch from Tracker if the vehicle has a GPS unit.
- Review the Mileage Allowance section. It’s pre-filled with the allowance agreed on the booking, or with the resolved default and a hint telling you where it came from — the vehicle default or a class mileage tier for the booking’s length.
- Edit Km per day, Km in total or the price to change it for this booking only.
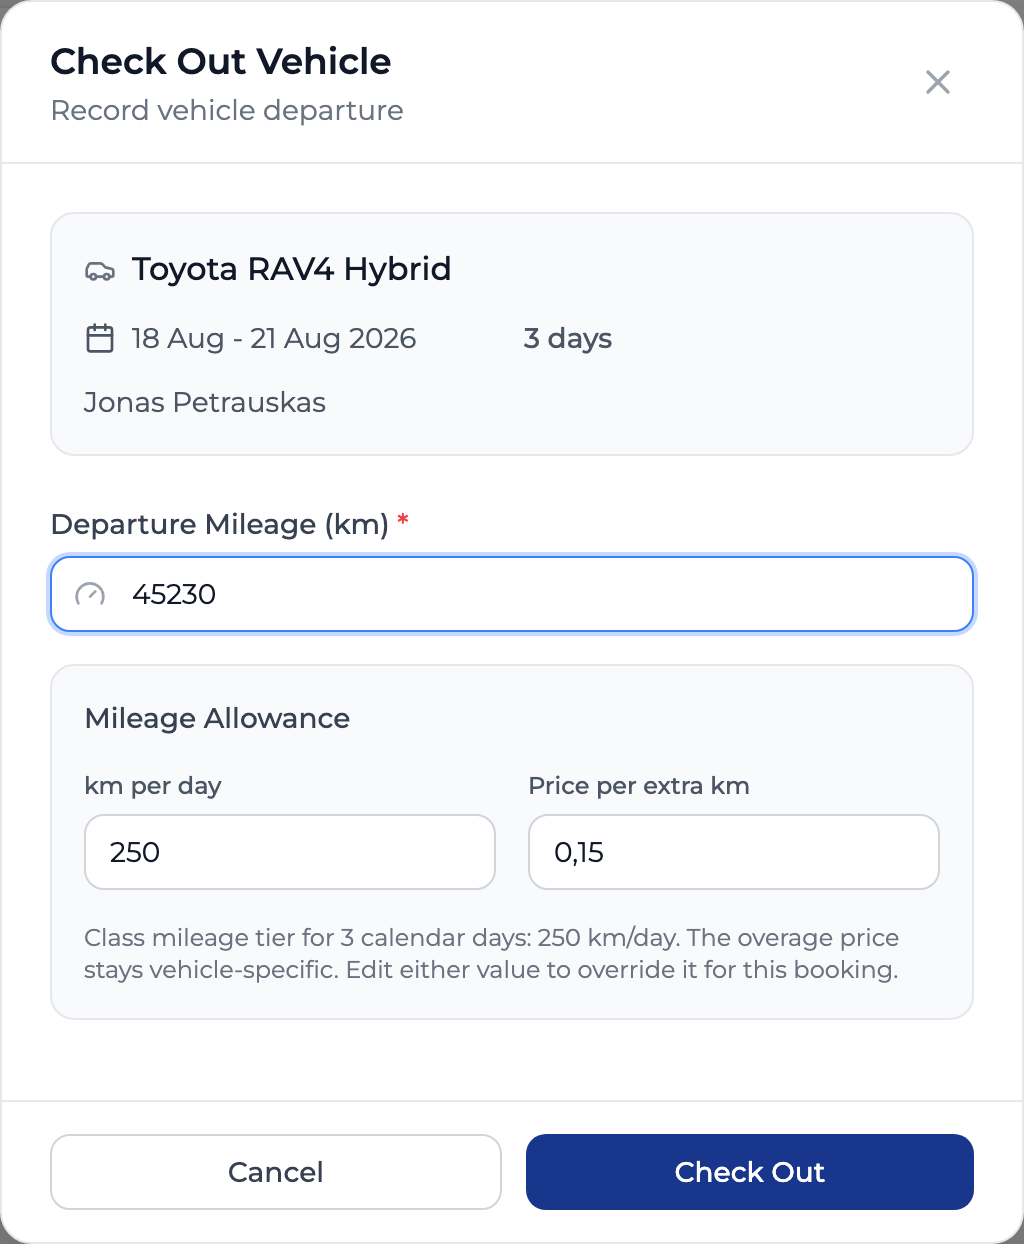
The allowance and overage price are saved onto the booking at check-out, so later changes to tiers or vehicle defaults never affect a rental that’s already on the road. If something was entered wrong, use Edit Allowance on the booking page at any time.
At Check-In
- Enter the Return Mileage or fetch it from the tracker. If an incorrect pickup capture means the return reading is lower, explicitly confirm the lower reading to continue. Calculated distance driven never drops below zero.
- The Mileage Summary updates live: distance driven, the allowance math, and the overage charge if the customer went over.
- Click Next to complete the remaining check-in steps, including defects, equipment, and repairs where applicable. Finish with Check In or Continue to Handover if you use handover documents.
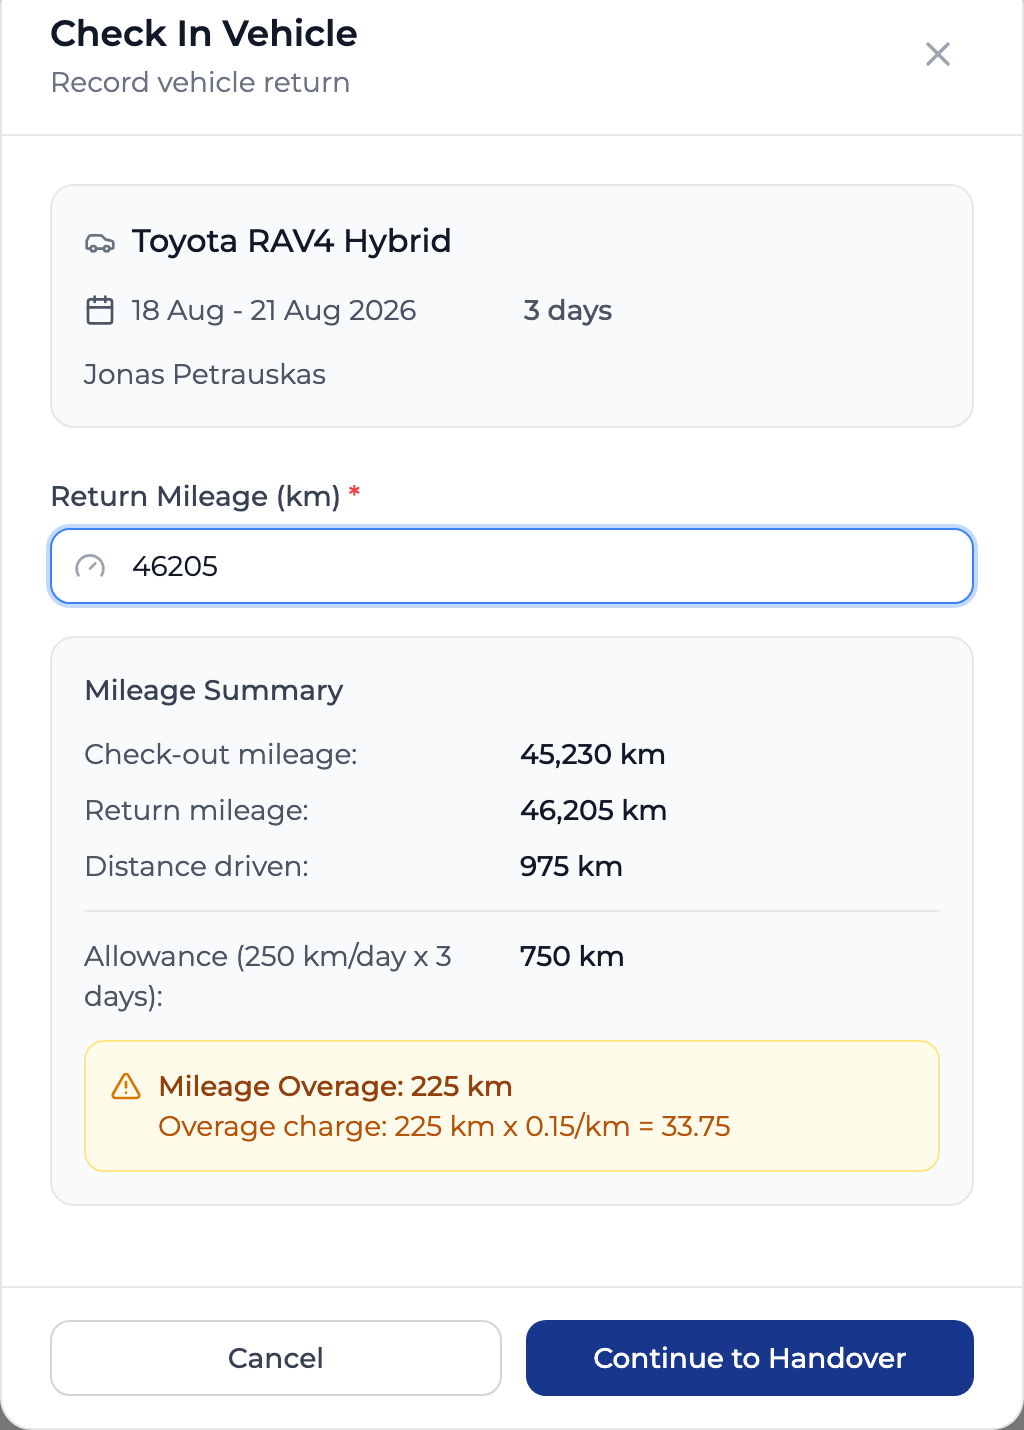
The overage charge is added to the booking total automatically, and the payment balance updates with it — a fully paid booking becomes partially paid with the overage left to collect.
After Check-In
- The booking page shows a Mileage Summary with the distance driven, total allowance, and either the overage or Within allowance.
- Edit Allowance still works after check-in — the overage is recalculated and the booking total swaps the old charge for the new one.
- On invoices and rendered documents the charge appears as an Excess mileage line. Contract templates can print the terms with the
{kmAllowancePerDay},{pricePerExtraKm},{includedKm},{mileageOverageKm}and{mileageOverageAmount}placeholders.